Uživatelské nástroje
pitel:projekty:ddwrtguestwifi
Guest Wi-Fi with DD-WRT
There are plenty of howtos about that, but none of them seems to match current state of DD-WRT firmware. So I decided to write my own.
This guide is written for DD-WRT v3.0-r27944 std (10/09/15) running on TP-LINK TL-WR1043ND.
Adding virtual interface
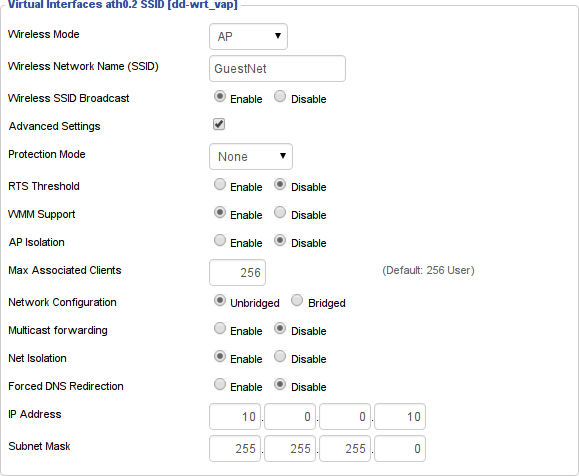
- Go to Wireless → Basic Settings and click on Add button.
- Name your new network and check Advanced Settings.
- Switch Network Configuration to Unbridged.
- Enable Network Isolation and set IP Address and Subnet Mask to something other then your home network.
- Save & Apply Settings.
You should now see the network, but you will have to manualy set IP address and you will get no internet.
DHCP
- Go to Setup → Networking and scroll all the way down to DHCPD section and click Add.
- Choose your new interface (shuld be something like
ath0.1) and tweak the other settings if you want. - Save & Apply Settings.
You should now get assigned IP address after connecting to the network. But still no internet.
Firewall
- Go to Administration → Commands and save the following commands as Firewall.
- Save & Apply Settings.
iptables -I FORWARD -i ath0.1 -d `nvram get lan_ipaddr`/`nvram get lan_netmask` -j logdrop
iptables -t nat -I POSTROUTING -o br0 -s 10.0.0.0/24 -j MASQUERADE
iptables -I INPUT -i ath0.1 -j logdrop
iptables -I INPUT -i ath0.1 -p udp --dport 67 -j ACCEPT
iptables -I INPUT -i ath0.1 -p udp --dport 53 -j ACCEPT
iptables -I INPUT -i ath0.1 -p tcp --dport 53 -j ACCEPT
Replace
10.0.0.0, ath0.1 and maybe br0 with your settings!
It enables port forwarding, but disable access from guest network to your home network, except DNS and DHCP.
You should now have separate Wi-Fi network with internet access.
/var/www/wiki/data/pages/pitel/projekty/ddwrtguestwifi.txt · Poslední úprava: autor: 127.0.0.1


